





Summary
A comprehensive guide to create your own custom class courses with online events in KnowledgeCity LMS.
Introduction
Once your Class course is configured, you can schedule live online events such as webinars or virtual classrooms. This guide walks you through creating online events within your course, setting participant limits and dates, configuring registration approval workflows, and enabling key features like event recordings and completion certificates. These steps help you build structured, interactive virtual learning sessions.
Steps to Follow
Creating Your Online Class Event
Once you have created your new class course and configured course details as covered in Creating a Custom Class Course in KnowledgeCity LMS, you are ready to create an online class event.
Follow the steps below to create, schedule, and manage your online class event.
- Navigate to the Courses > Custom page.
- Click on your newly created class course from the list to open its course details page.
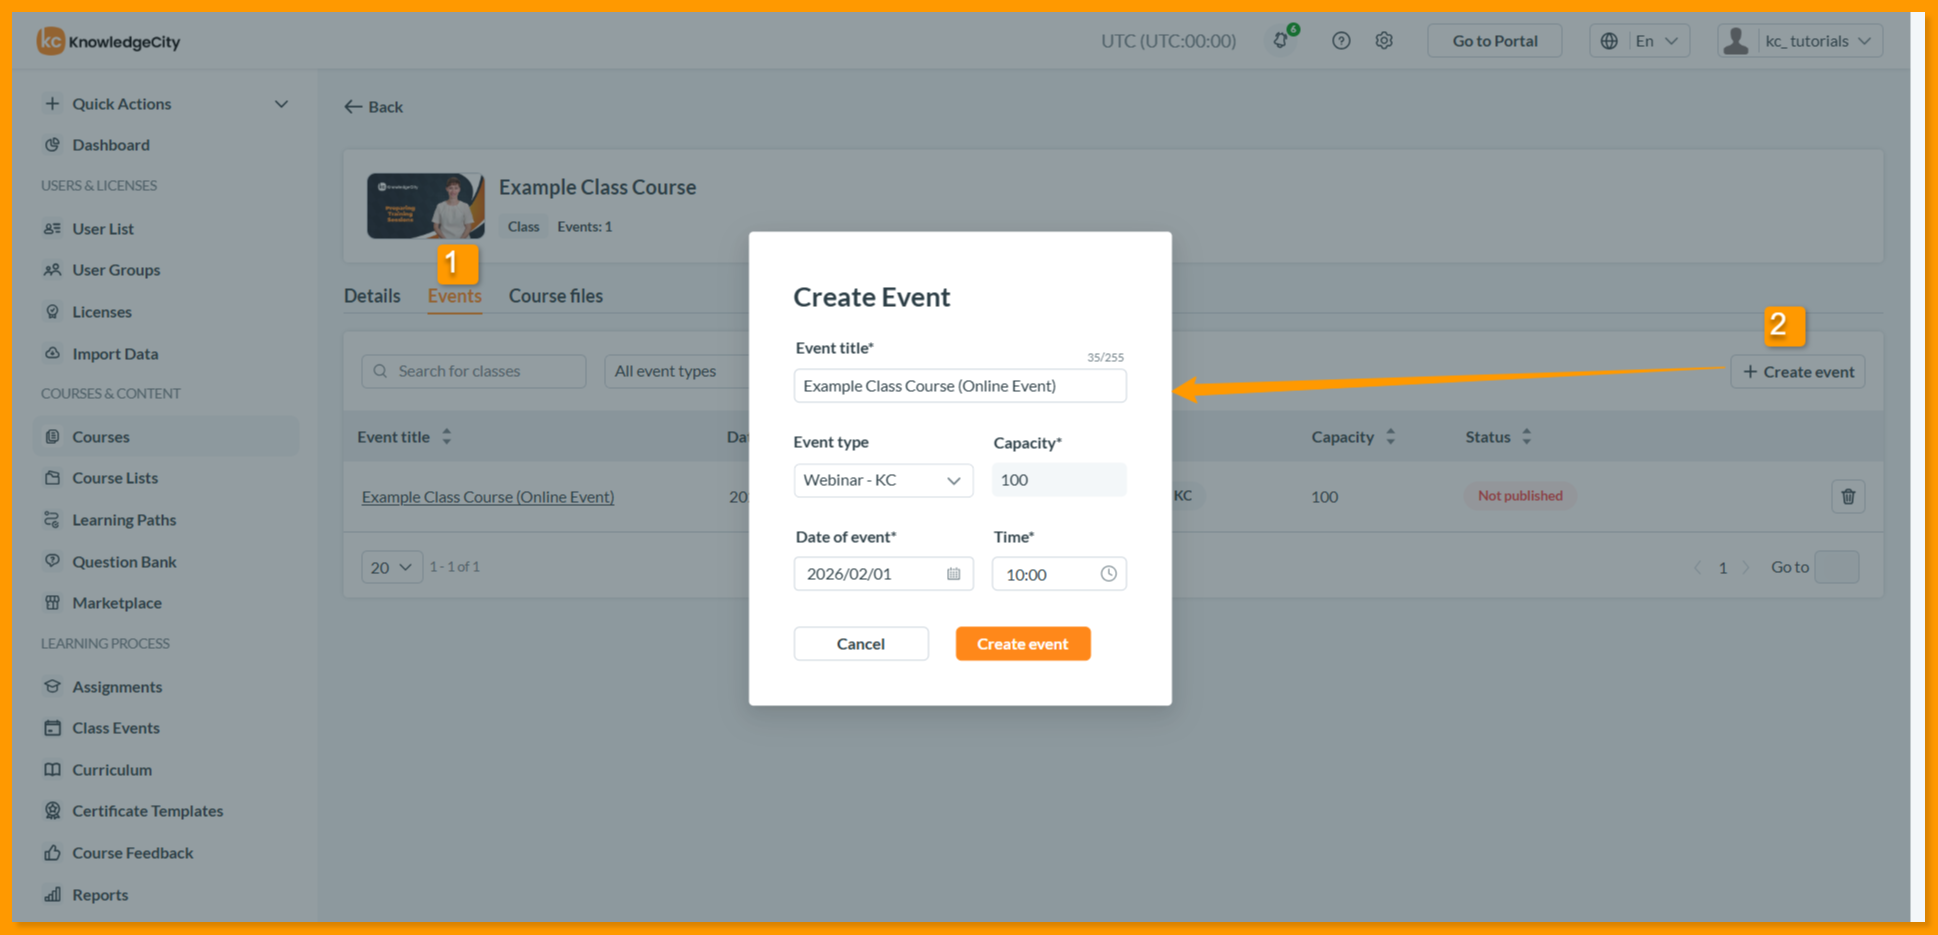
- Select the "Events" tab at the top of the page. This is where you create, schedule, and manage your online class event.
- The Events section provides a search bar and event type filter for finding specific classes. The table headers allow users to sort the list of events by criteria such as Event title, Date of event, time, type or status.
- The Create event button initiates adding a new class event, while the Remove event button allows for the removal of existing events.
- Click the "Create event" to start a new event
- Event title*: The required name for this specific event.
- Event type: Select the "Webinar" option to create a new online class event.
- Capacity*: Set the maximum number of attendees allowed for this event.
- Date of event*: Choose the calendar date when the event will occur.
- Time*: Select the start time for the event.
Configuring Event Details
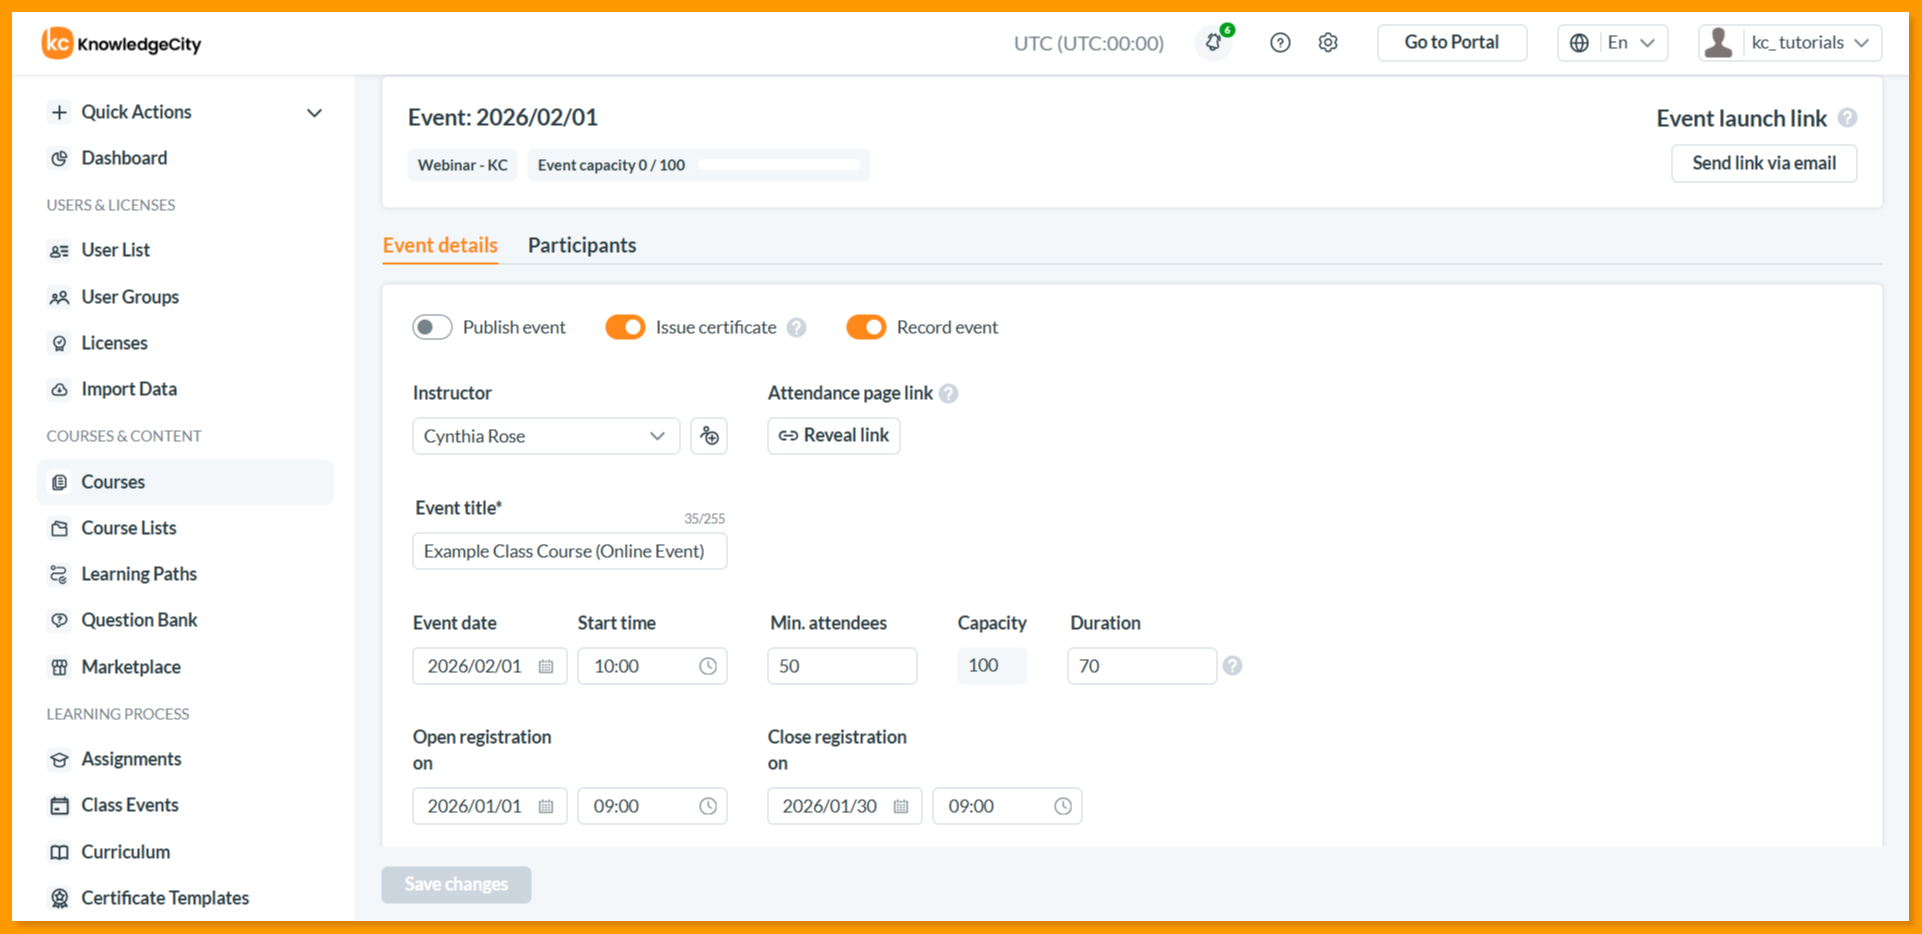
- Once a new event is created, You will be brought to the "Event Details" page of the new event. Additional parameters can be applied here including:
- Event launch link: A unique URL to start or launch this online event (Once shared via email, the host will receive an email with a link and will be able to start the online event on scheduled date).
- Publish event: Toggle this on to publish the event and available for registration.
- Issue certificate: When this option is turned on, the attendees will receive the certificates on passing the course.
- Record event: Toggle this on to automatically record the event session.
- Instructor: Select the name of the Instructor from the dropdown menu. If the desired Instructor is not listed, create a new one using the "+" icon.
- Attendance page link: A unique external URL to view or share the check-in page for participants (This is the page listing the students assigned to the event to mark their attendance. This page will be available for 48hrs after the events completion).
- Event title: Specify or edit the name of your specific online event.
- Event date & Start time: Set the date and time when your event will begin.
- Min. attendees & Capacity: Set the required minimum and maximum number of attendees for the event.
- Duration: Set the total length of the event in minutes (Take into consideration an additional 10 minutes for students to join the online event).
- Open registration on & Close registration on: Control the registration window by setting the start and end dates for sign-ups.
- Event description: Provide the description of event in the selected language(s). You can use HTML to style the description (limited to H3 headings, bold, italic, underline, hyperlinks, numbered and bulleted lists).
- Terms of Use required: Toggle this on to prompt users to read and agree to the Terms of Use in order to send registration request to the line manager.
- Capacity allocation: For Webinar - Zoom events, you can reserve part of the capacity for a specific audience. Click Add allocation rule, set Allocate to to either Group or User field, then choose the Group, or the User field and its Value, and enter the number of Seats. The block shows how many of the event capacity seats are allocated and keeps an Everyone else count for the seats left for the remaining registrants. If the rules add up to more than the event capacity, a message states that the allocated seats exceed the event capacity and the values must be corrected. When an allocation is full, a request from a learner covered by that rule is declined because no seats remain in that allocation.
Approval Type for Event Requests
- Auto Approval
All registration requests are automatically approved. However, admin with relevant permissions can still change the status of an individual request in the event’s Participants list page if needed.
- Manual Approval
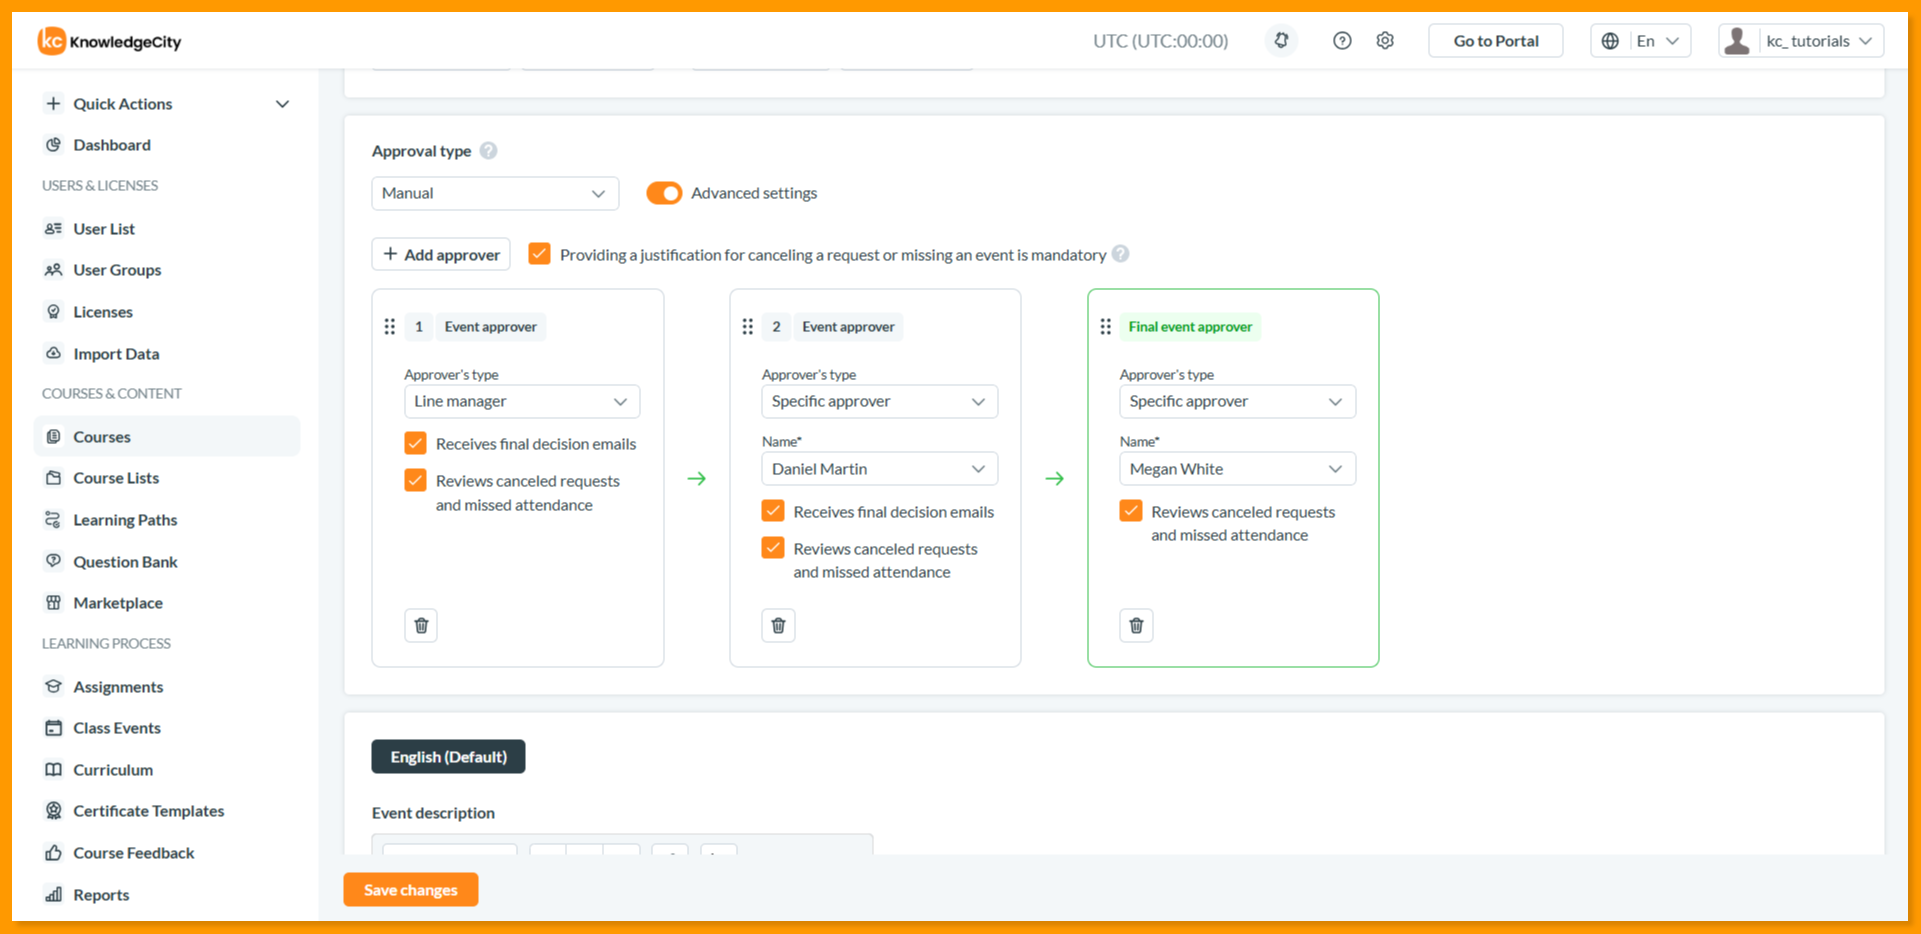
Each request requires individual approval by an administrator or assigned approver. Notifications containing the request details and justifications are sent to the designated administrators for review and approval. Advanced Settings: When enabled, allows you to set up an approval chain.
- Add approvers in sequence, choosing either:
- Line Manager
- Specific Approver
- Approval Process:
- Approvers are notified via email and through the My Requests section within the class event.
- Requests move through the chain in order, but a later approver can override earlier decisions.
- Once the next approver acts, previous decisions cannot be changed.
- Notifications: Approvers receive email notifications for pending requests and final decisions. You can enable or disable the following toggles: Receives final decision emails, which allows you to define whether one or more specific approvers should receive the email notification containing the user’s final approval decision, and Reviews canceled requests and missed attendance, which enables notifications and review access for canceled requests and attendance records.
- Domain rules: The chain you build applies as the default approval chain. Click Add domain rule to add a separate chain for specific email domains, give it a Rule name and list the Email domains, separated by commas. Requests from students whose email domain matches a rule are routed to that chain, and every other request follows the default chain.
Justification Requirement (Manual Approval Only) When enabled, students must provide a reason if they cancel a request or miss an event.
Process Flow:
- Student cancels or misses
↓
- System asks for a reason (student must enter one)
↓
- Reason is emailed to assigned approver(s)
↓
- Approver reviews & decides as below:
| Scenario | If Approved | If Rejected |
|---|---|---|
| Cancellation | Status → "Canceled by User" | Status unchanged (comment required) |
| Missed Event | Attendance → "Excused" | Stays "Missed" (comment required) |
Inviting Participants
After configuring the event details, the next step is to send invitations.
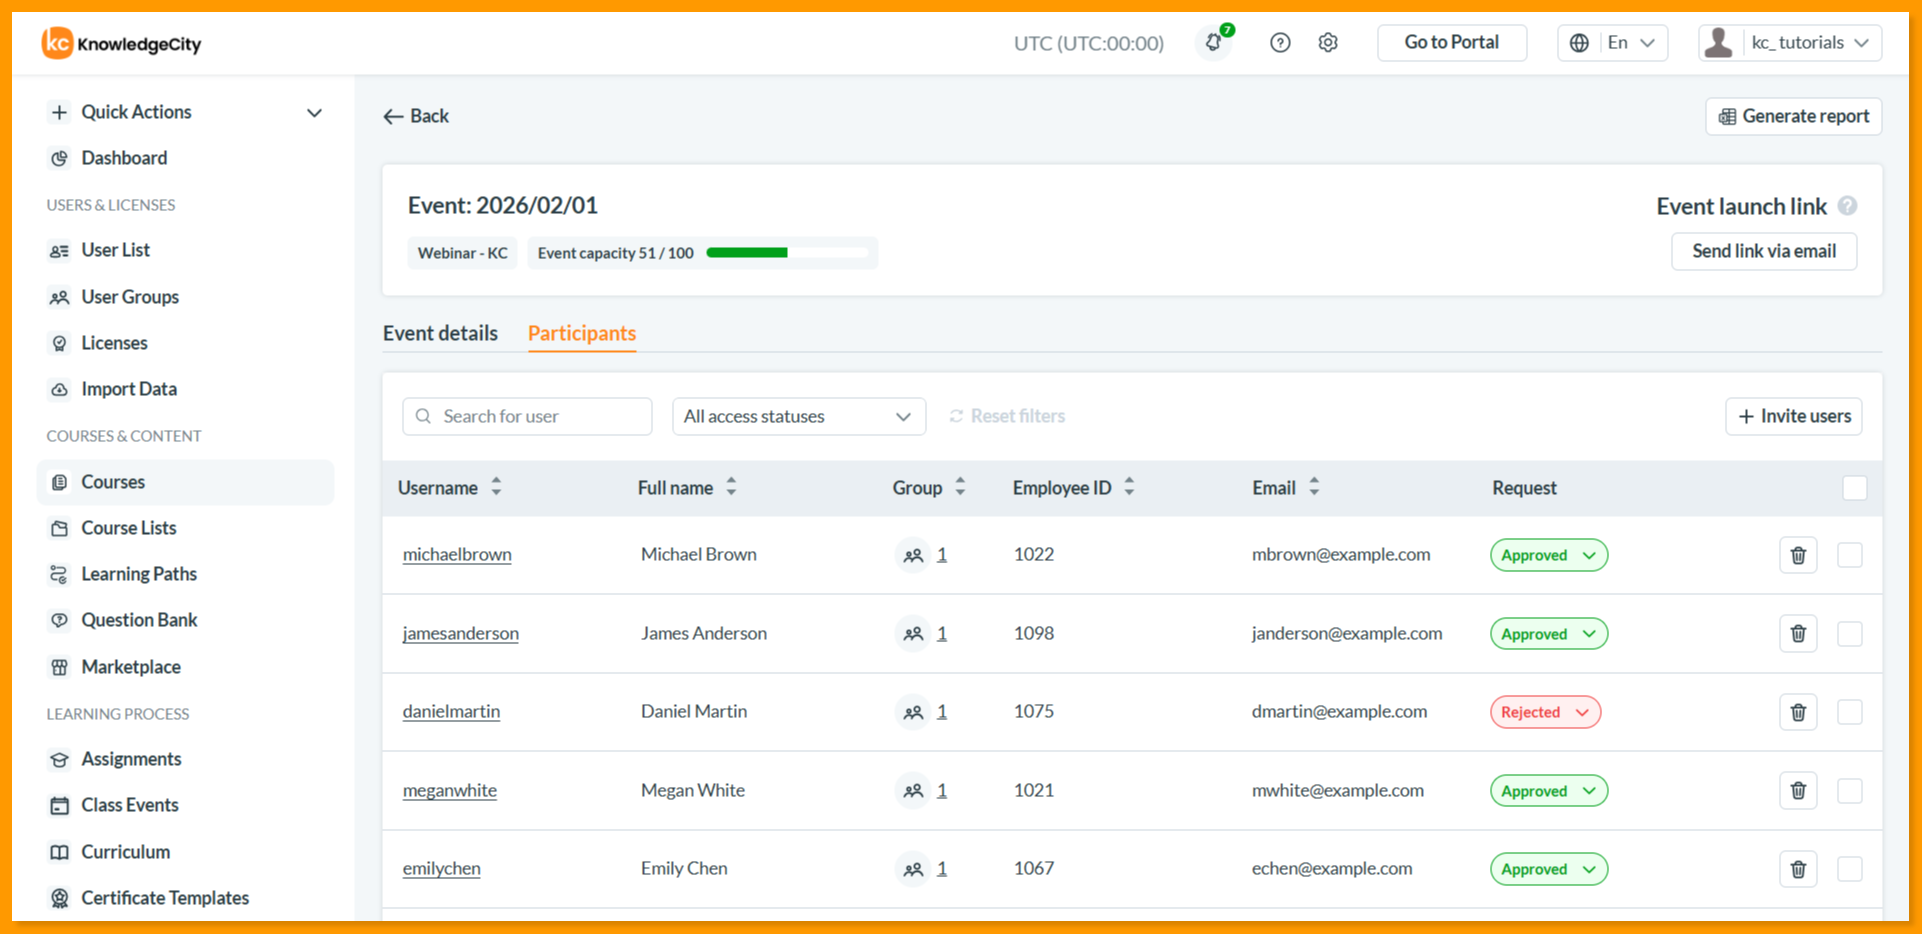
- Navigate to the Participants Tab: Click the "Participants" tab next to the Event details tab.
- Invite users: Click the "Invite users" button to open the popup window.
- Select Recipients: Inside popup window, select the specific users or entire user groups you wish to invite to the event.
- Additional comments (Optional): Include any special instructions or notes for the invitees in the message field.
- Send Invitations: Click Invite users to dispatch the invitations. Selected participants will receive a notification email about the event.
- Manage Registration Status: In the Participants list, you can manually change a user's registration status (e.g., Approved or Rejected) in case of auto approvals and remove users from the event individually or in bulk using the checkboxes and action menu.
- Generate Report: Use the "Generate Report" option to download a complete list of participants, including their registration details and status. The file contains one row per participant.
- Approve within capacity: The Event capacity counter on the Participants tab shows how many registrations are approved out of the capacity. Once it is reached, no more users can be approved, and approving a selection larger than the remaining seats stops with Approval failed. Requests are also declined automatically when the event overlaps with another event the learner is registered for, when a limit set for your account or for the class has been reached, or when no seats remain in the allocation that applies to the learner.
Cancelling an Event
An event that will not go ahead can be cancelled from the event page, so learners stop seeing it while the record of it survives for reporting.
- Open the event you want to cancel and click Cancel event in the page header. The button appears only while the event is still ahead of you and has not already been cancelled; an administrator whose access to Courses or Class Events is view-only will not see it.
- Read what cancelling does. The dialog explains: "The event will be marked as cancelled and hidden from learners. Participants keep their records so the cancellation shows up in reports. This cannot be undone."
- Choose a Cancellation reason. Open Select a reason and pick one of Low attendance, Change in priorities, Scheduling conflict, Instructor unavailable, or Other.
- Add a Comment. The comment is optional for every reason except Other, where it is required — “A comment is required when the reason is “Other”.” You can write up to 500 characters.
- Decide who hears about it. Notify participants and approvers by email is selected by default. Clear it if you would rather tell people yourself.
- Confirm. The event is marked Cancelled and a confirmation appears.
After cancelling. The event keeps its place in your records and shows a Cancelled badge carrying the reason and the date it was cancelled. On the Class Events list, the status filter gains a Cancelled events option alongside Future events and Passed events — cancelled events keep their original date, so they can sit on either side of today. The exported events list gains Event status, Cancellation reason, Cancelled on and Approved at cancellation columns, the last of which preserves how many registrations stood approved at the moment you cancelled.
Conclusion
By following these steps, you have set up structured and manageable online events for your learners. Your virtual sessions are now configured with participant limits, approval workflows, and key features like recordings. To complete your course setup you can now publish and proceed to manage participants and track attendance. For help with advanced and complex online event setup, contact your KnowledgeCity Success Team.