





Summary
If you or members of your organization are having trouble accessing the KnowledgeCity platform, this guide will walk you through a series of troubleshooting steps: from quick checks you can do yourself to how to collect diagnostic information to share with our support team.
Step 1: Quick Self-Service Checks
Before contacting support, please try the following steps. These resolve the majority of access issues.
1.1 Test on a Different Network (Mobile Data)
The most important first test is to switch to a different internet connection:
Disconnect from your office Wi-Fi or wired network
Enable mobile hotspot on your phone and connect your computer to it
Try accessing your portal URL again
If the portal loads on mobile data but not on your office network, the issue is with your corporate network, firewall, or VPN: not with the platform itself. Continue to Step 3.
If the portal does not load on mobile data either, the issue may be account-related or platform-specific. Please contact our support team directly.
1.2 Try an Incognito / Private Browser Window
Browser extensions, cached data, or stored cookies can sometimes interfere with portal access:
Open a new Incognito window (Windows:
Ctrl+Shift+N/ Mac:Cmd+Shift+N) or Private window (Firefox/Edge:Ctrl+Shift+P)Navigate to your portal URL
Try to log in
If this works, clear your regular browser's cache and cookies, then try again in a normal window.
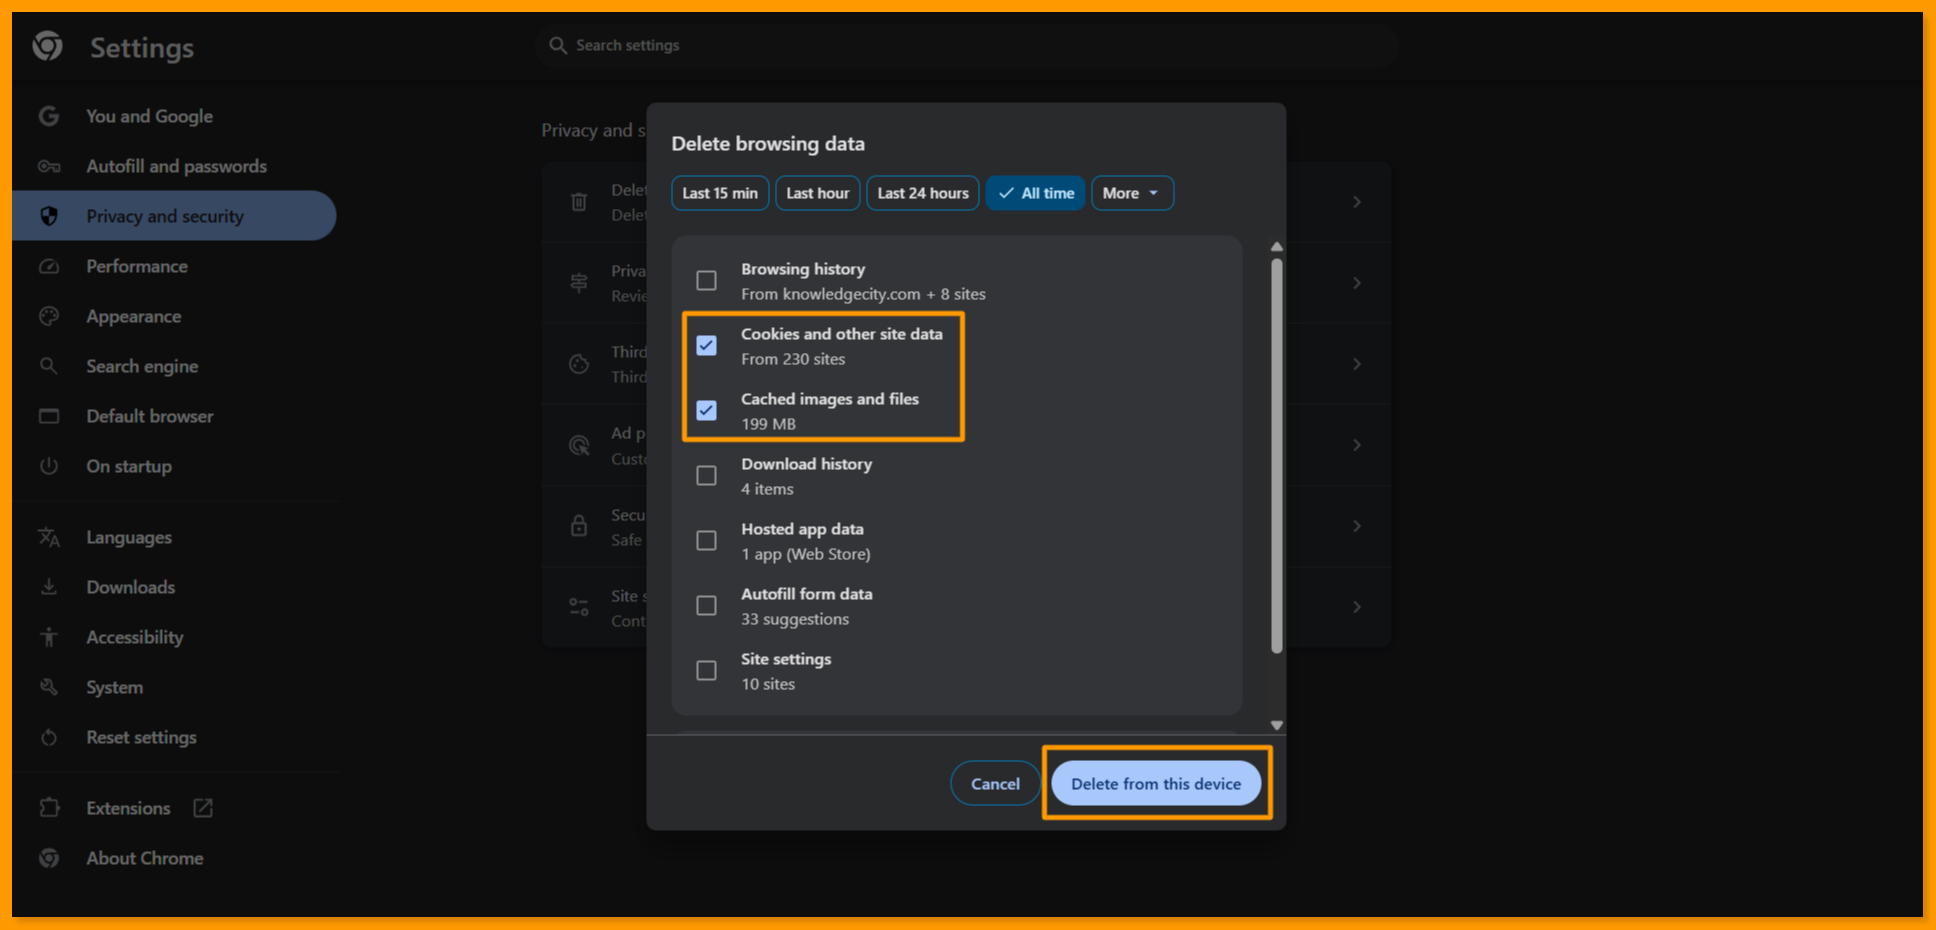
1.3 Clear Browser Cache and Cookies
Chrome:
Press
Ctrl+Shift+Delete(Mac:Cmd+Shift+Delete)Set the time range to All time
Check Cookies and other site data and Cached images and files
Click Clear data
Restart your browser and try again
Firefox / Edge: The same shortcut (Ctrl+Shift+Delete) opens a similar dialog.
1.4 Verify Your Portal URL
Please double-check the URL you are using:
It must start with
https://(nothttp://)It should match exactly the link provided to you by your administrator or account manager
There should be no extra spaces or characters
1.5 Try a Different Browser
If the issue persists, try accessing the portal from a different browser (e.g., if you normally use Chrome, try Edge or Firefox). This can help isolate whether the issue is browser-specific.
🏢 Step 2: Corporate Network & VPN Issues
If the portal works on mobile data but not on your office network, the issue is most likely a corporate firewall or VPN restriction. This is common in organizations with strict IT security policies.
What to check with your IT department
Please ask your IT team to verify the following:
Firewall: Ensure that
knowledgecity.comorknowledgecity.sa(based on the region) and all of its subdomains (*.knowledgecity.comor*.knowledgecity.sa) are whitelisted (allowed) in your corporate firewall and proxy settings.VPN split tunneling: If your organization uses a VPN, confirm whether traffic to
knowledgecity.comis being routed through the VPN. If so, ask IT to exclude it from the VPN tunnel (this is called "split tunneling").DNS filtering: Some corporate networks use DNS filtering that can block certain domains. Ask IT to verify that
knowledgecity.comis not blocked at the DNS level.SSL inspection / deep packet inspection: Some firewalls inspect HTTPS traffic in a way that breaks certain web applications. Ask IT whether this is enabled and whether
knowledgecity.comcan be excluded.
Step 3: Collecting Browser Diagnostic Information
If the above steps do not resolve the issue, our support team will need diagnostic information from your browser. This helps us understand exactly what is happening when you try to access the portal.
3.1 Opening the Browser Developer Tools (DevTools)
All browsers (Chrome, Edge, Firefox):
Press
F12on your keyboard, ORPress
Ctrl+Shift+I(Mac:Cmd+Option+I)
This opens the Developer Tools panel, usually appearing on the right side or bottom of your browser window.
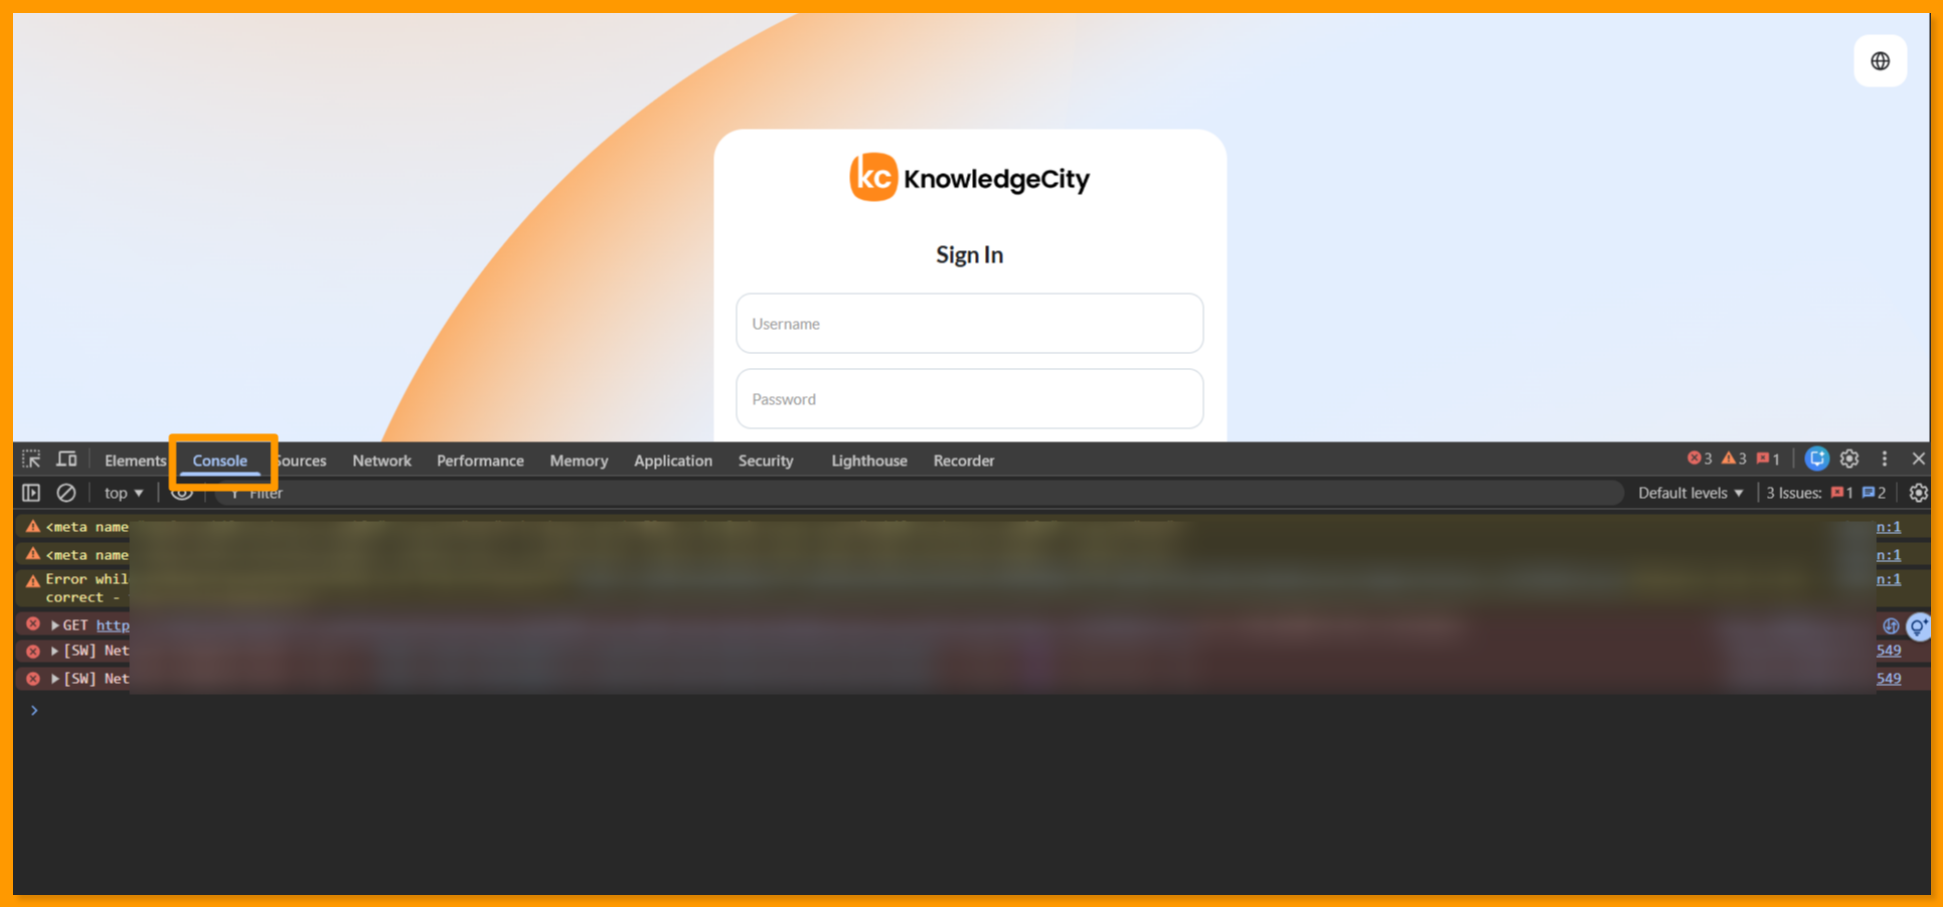
3.2 Opening the Console Tab
In the DevTools panel, click the Console tab at the top
Try to access your portal and reproduce the error
Take a screenshot of any red error messages that appear
⚠️ Please note: You may see some yellow warnings: these are usually not relevant. We are primarily interested in red error messages.
3.3 Opening the Network Tab with Preserve Log
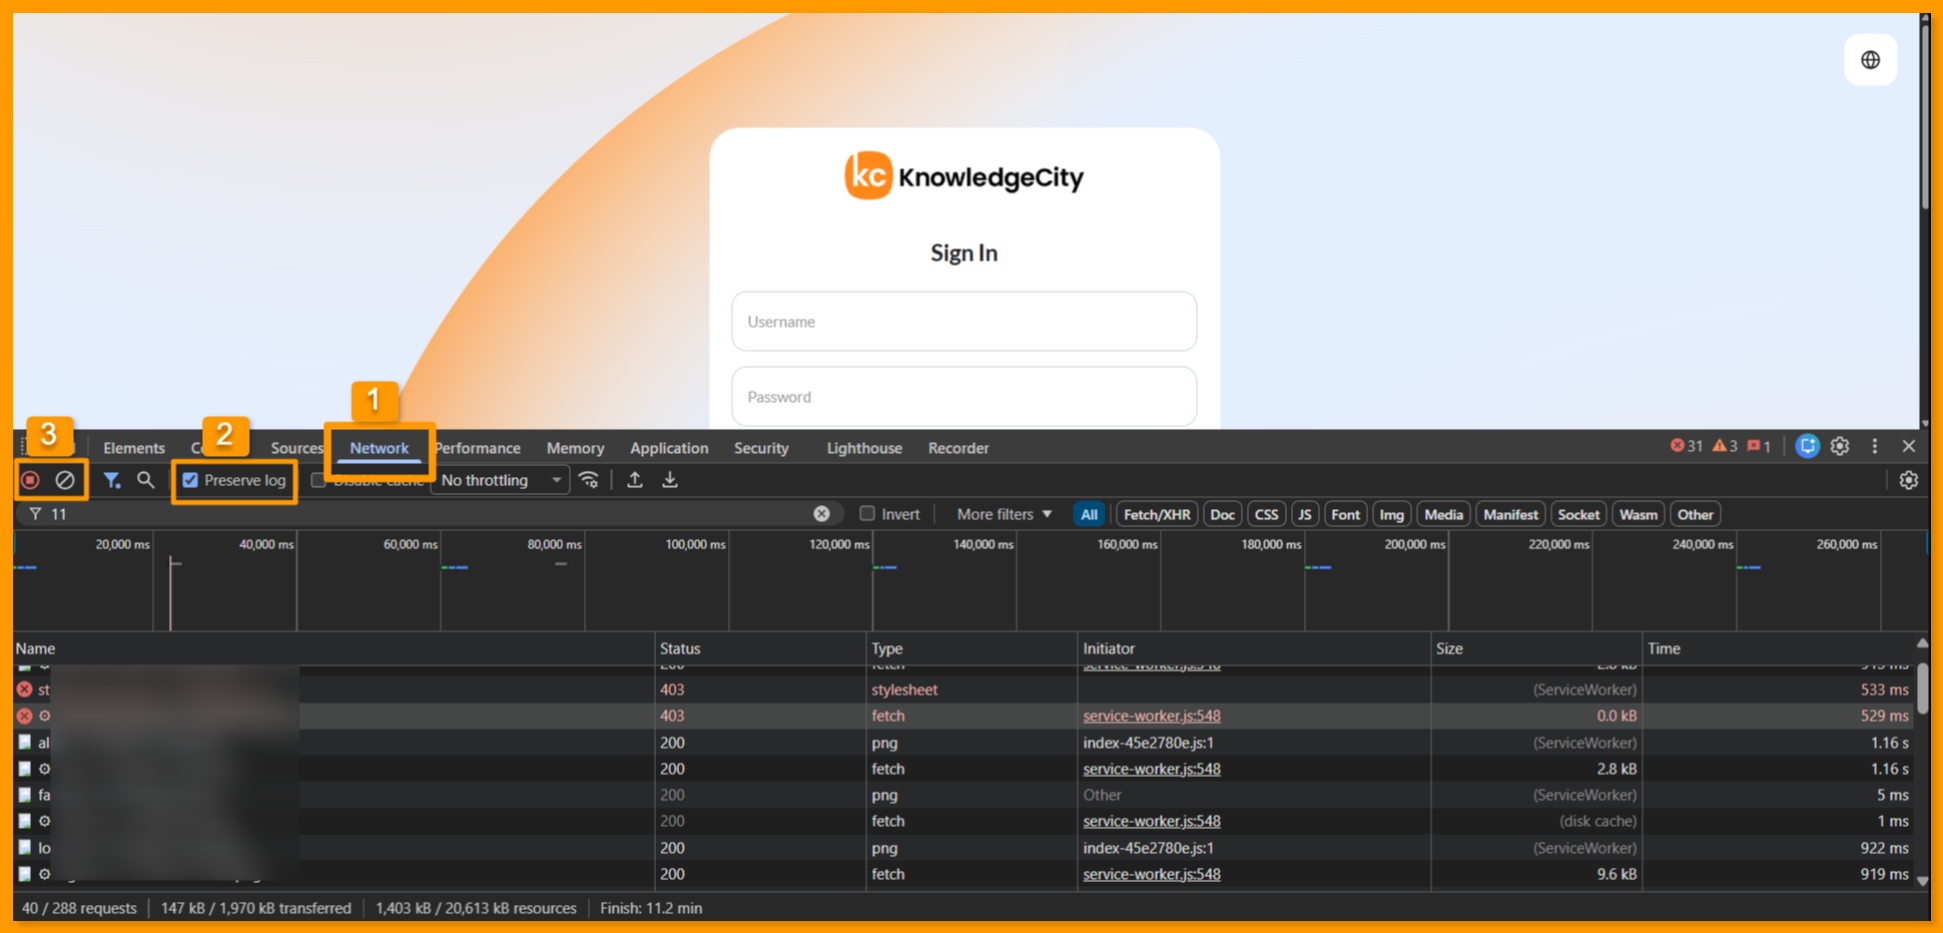
The Network tab shows all the requests your browser makes when loading a page. The Preserve Log option ensures that the log is not cleared when the page navigates or redirects, which is important for capturing access errors.
Steps:
In the DevTools panel, click the Network tab
Enable Preserve Log: Check the box labeled Preserve log at the top of the Network panel
Make sure the recording button (a red circle ⏺) is active: it should already be recording by default
Clear the existing log by clicking the 🚫 (clear) icon
Now navigate to your portal URL and reproduce the issue
Take a screenshot of the Network tab showing the list of requests, especially any requests highlighted in red (failed requests)
💡 In the screenshot, the columns we need to see are: Name, Status, Type, and Time. The red/failed entries at the top are the most important.
3.4 Exporting a HAR File
A HAR file (HTTP Archive) is a complete recording of all network activity in your browser during a session. It gives our technical team the full picture of what happened when you tried to access the portal.
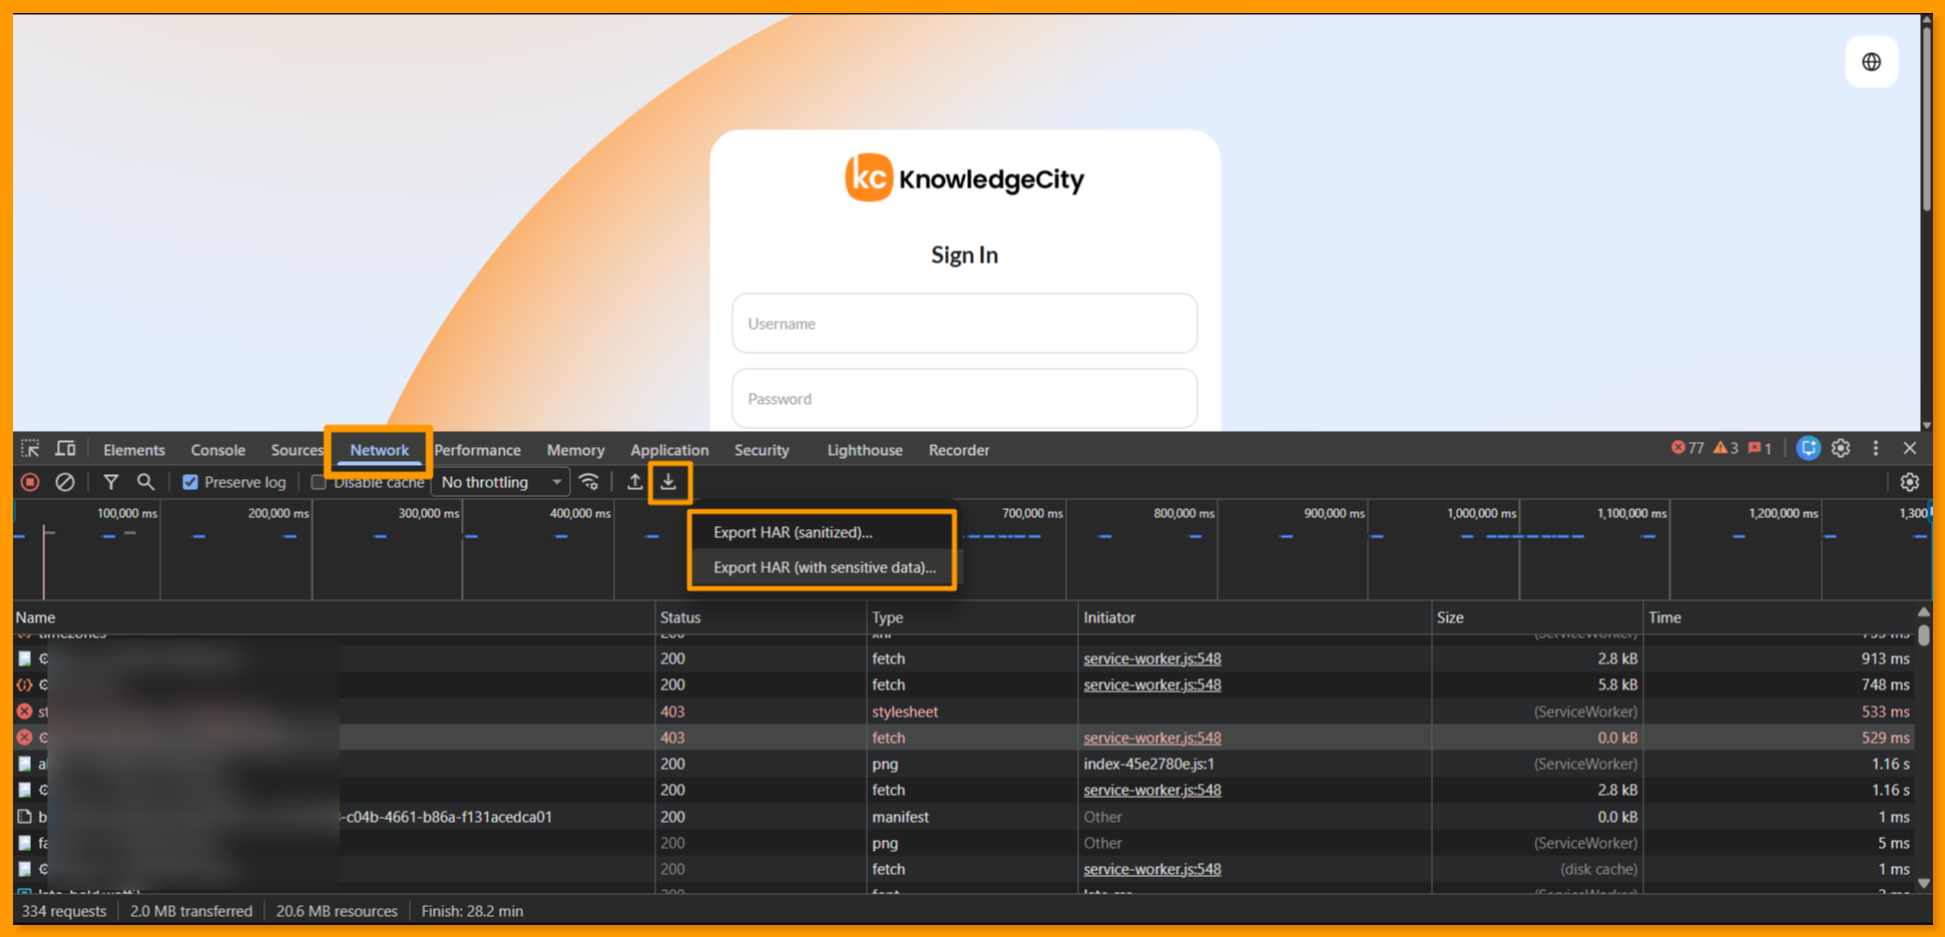
How to export a HAR file in Chrome / Edge:
Open DevTools (
F12) and go to the Network tabEnable Preserve log (see Step 3.3 above)
Clear the log (🚫 icon)
Navigate to your portal and reproduce the issue
Once the error occurs, right-click anywhere in the Network request list
Select "Save all as HAR with content"
ORClick for the Export button in the Network tab toolbar and select Export HAR.
Save the file to your computer: it will have a
.harextension
How to export a HAR file in Firefox:
Open DevTools (
F12) and go to the Network tabEnable Persist Logs (equivalent of Preserve Log)
Reproduce the issue
Click the gear icon (⚙️) in the Network tab toolbar
Select "Save All as HAR"
🔒 Privacy note: HAR files can contain sensitive information such as cookies and authentication tokens. Please do not share HAR files in public channels: only send them directly to your account manager or support team via secure email or a private message.
Step 4: What to Share with Your Account Manager or Support Team
When contacting support, please provide as much of the following as possible. The more information you share, the faster we can identify and resolve the issue.
Information | Why it helps |
|---|---|
Portal URL you are trying to access | Identifies which portal and configuration is affected |
Number of affected users | Helps determine if it's an individual or organization-wide issue |
Whether it works on mobile data | Confirms if the issue is network-related |
Whether it works in incognito mode | Confirms if the issue is browser/cache-related |
Browser name and version | Helps identify browser-specific problems |
Operating system | Helps narrow down environment-specific issues |
Screenshot of the Console tab (with any red errors) | Provides application-level error details |
Screenshot of the Network tab (with failed requests visible) | Shows which requests are failing and with what status codes |
HAR file | Provides the full technical picture for our engineers |
Whether a corporate VPN or proxy is in use | Critical for diagnosing network-level blocks |
Still Need Help?
If you have followed the steps above and are still experiencing issues, please reach out to our support team through the Help Desk portal:
When submitting your request, please attach the screenshots and HAR file collected in Step 3 and include all relevant details from the table in Step 4. This will help our team resolve your issue as quickly as possible.