





Summary
Webhooks let the Safety App notify another system the moment something happens in your account: an incident is submitted, an investigation changes, a corrective action is completed. You register an address that can receive those notifications, choose which events should reach it, and optionally add a signing secret so the receiving system can confirm each message genuinely came from the Safety App. This article covers creating a webhook, securing it, monitoring its deliveries, and removing it.
Introduction
Most safety programs sit alongside other tools: a chat workspace where the team already talks, an automation service that opens tickets, a reporting warehouse, an operations dashboard. Without webhooks, those systems have to keep asking the Safety App whether anything has changed. With webhooks, the Safety App tells them as each event happens.
Webhooks are configured by Super Admins in the account settings. They solve the problem of delay and duplication between systems: rather than someone re-entering an incident in a second tool, or a dashboard refreshing on a timer and lagging behind reality, the receiving system is notified as the event occurs and can act on it straight away.
Key Concepts
- Webhook: a saved connection between your Safety App account and one external address, covering a chosen set of events. Each webhook has its own name, address, event selection, and delivery history.
- Endpoint: the address on a server you control that receives the notifications. It must be reachable over a secure connection and able to accept incoming requests.
- Event: the specific thing that happens in the Safety App, such as an incident being submitted or a corrective action being completed, that causes a webhook to fire.
- Signing secret: an optional value you set on a webhook. The Safety App uses it to sign every message it sends, so the receiving system can confirm the message is genuine and was not altered along the way.
- Delivery log: the record of recent send attempts for a single webhook, showing the event, whether the attempt succeeded, the response your endpoint returned, any error message, and the time of the attempt.
- Failures: a count of recent unsuccessful deliveries, shown on the webhook list so a broken connection stands out without opening the log.
Steps to Follow
Opening the Webhooks settings
Sign in as a Super Admin, open Settings, then the Integrations group, then Webhooks. The page lists every webhook configured for your account. Alongside each one you can see whether it is Active, how many recent Failures it has recorded, and when it was Last Triggered, which together give you a quick read on the health of every connection.
Preparing an endpoint to receive notifications
Before creating the webhook, make sure you have an address that can accept incoming requests over a secure connection, and that you control it. The receiving system should acknowledge each message promptly: if your endpoint answers with an error or takes too long to respond, the attempt is recorded as a failed delivery rather than a successful one. It is worth confirming the endpoint works before you point the Safety App at it, so that any early failures are easy to interpret.
Creating a webhook
Select + New Webhook and complete the form:
- Name identifies the connection in the list. Use something that says where the messages go and why, so a colleague reviewing the list later understands its purpose.
- URL is the full secure address of your endpoint.
- Events determines which changes trigger a message. You can send several events to one endpoint, or create a separate webhook per event when you would rather keep each stream independent.
- Secret (for HMAC signing) is optional but strongly recommended, and is covered below.
Select Create. The webhook becomes active immediately and sends on the next matching event.
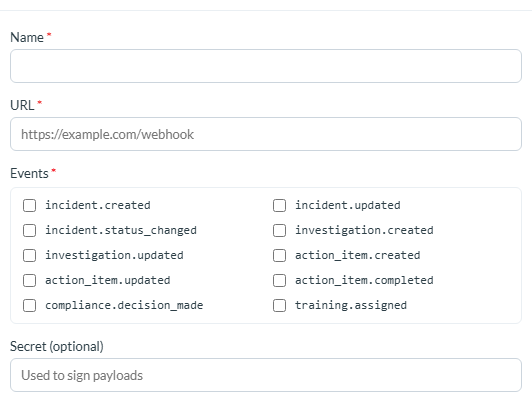
Caption: Select + New Webhook and complete the form.
Choosing which events to send
The Safety App can notify your endpoint when a new incident report is submitted, when an incident is edited, and when an incident moves to a new status. On the investigation side, it can notify you when a new investigation is opened and when an investigation is edited. For corrective and preventive actions, it can send a message when an action is created, when it is updated, and when it is marked completed. It can also notify you when a compliance review decision is recorded, and when a training assignment is created for a user.
Select only the events the receiving system will actually act on. A webhook subscribed to everything generates traffic the other side has to filter out, and it makes the delivery log harder to read when you are troubleshooting.
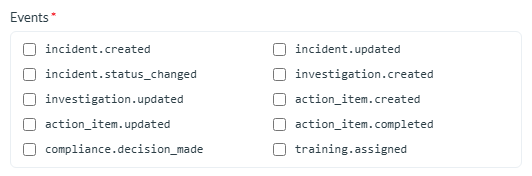
Caption: The Safety App can notify your endpoint when a new incident report is submitted, when an incident is edited, and when an incident moves to a new status.
Securing deliveries with a signing secret
Enter a value in the Secret (for HMAC signing) field and the Safety App will sign every request it sends to that endpoint, sending the signature along with the message. Your receiving system can then recalculate the signature from the same secret and compare the two before acting on anything.
This matters because an endpoint that accepts unsigned messages will act on anything sent to its address by anyone who discovers it. Verifying the signature is the difference between an endpoint that trusts the Safety App and one that trusts whoever happens to be sending. Share the secret only with the system that needs it, and treat it with the same care as a password.
Reviewing delivery logs and managing webhooks
To check whether a webhook is working, select the history icon on its row. The delivery log opens and shows recent attempts with the event, the outcome, the response your endpoint returned, any error message, and the timestamp. This is the first place to look when a downstream system stops reacting, because it tells you whether the Safety App sent the message and what your endpoint said in reply.
Each row also offers an edit icon, for changing the name, address, events, or secret, and a delete icon, which removes the webhook permanently and stops all further deliveries to that endpoint.
Conclusion
A webhook turns a change in the Safety App into an immediate message to a system that needs to know about it. Give each connection a clear name, subscribe it only to the events its receiver acts on, always set a signing secret so the receiving side can verify what it gets, and use the delivery log as your first diagnostic when something downstream goes quiet. Configured this way, webhooks keep the systems around your safety program current without anyone copying data between them.