





Summary
Investigation SLAs set how long an investigation may take, expressed in hours and defined separately for each severity level your account uses. Those numbers are what produce the countdown on every investigation and the overdue figures on the dashboard. This article covers where the settings live, how to change them, how to switch the requirement off for a severity level, and the important detail that changes apply only to investigations created afterwards.
Introduction
A deadline that is the same for everything is a deadline nobody takes seriously. A minor near miss and a serious injury both deserve investigation, but expecting the same turnaround for both either rushes the serious one or leaves the minor one taking up urgency it does not need. Tying the target to severity is what makes the deadline meaningful.
This is a Super Admin task, usually revisited once a program has been running long enough to see whether its targets match reality. Getting it right matters beyond the settings page itself, because these values drive what every investigator sees on their own cases and what leadership sees on the dashboard.
Key Concepts
- Severity level: the classification carried by the incident behind an investigation. The levels available here come from the severity matrix configured for your organization, so what you see reflects your own setup and may not match another account's.
- SLA hours: the number of hours allowed for an investigation at a given severity level. The system works in hours throughout, and this is the value that actually drives the deadline.
- Approximate days: a reference figure shown next to the hours to make a long value easier to read at a glance. It is informational only and is not what the system calculates from.
- No SLA: the state of a severity level whose value is set to zero. Investigations at that level display no countdown and are not counted as overdue.
- Due date: the deadline calculated for an individual investigation when it is created, from the SLA hours in effect at that moment.
Steps to Follow
Opening the Investigation SLAs settings
Sign in as a Super Admin, open Settings, then the Workflows group, then Investigation SLAs. The page shows one row per severity level, each with its current SLA hours and an approximate number of days alongside.
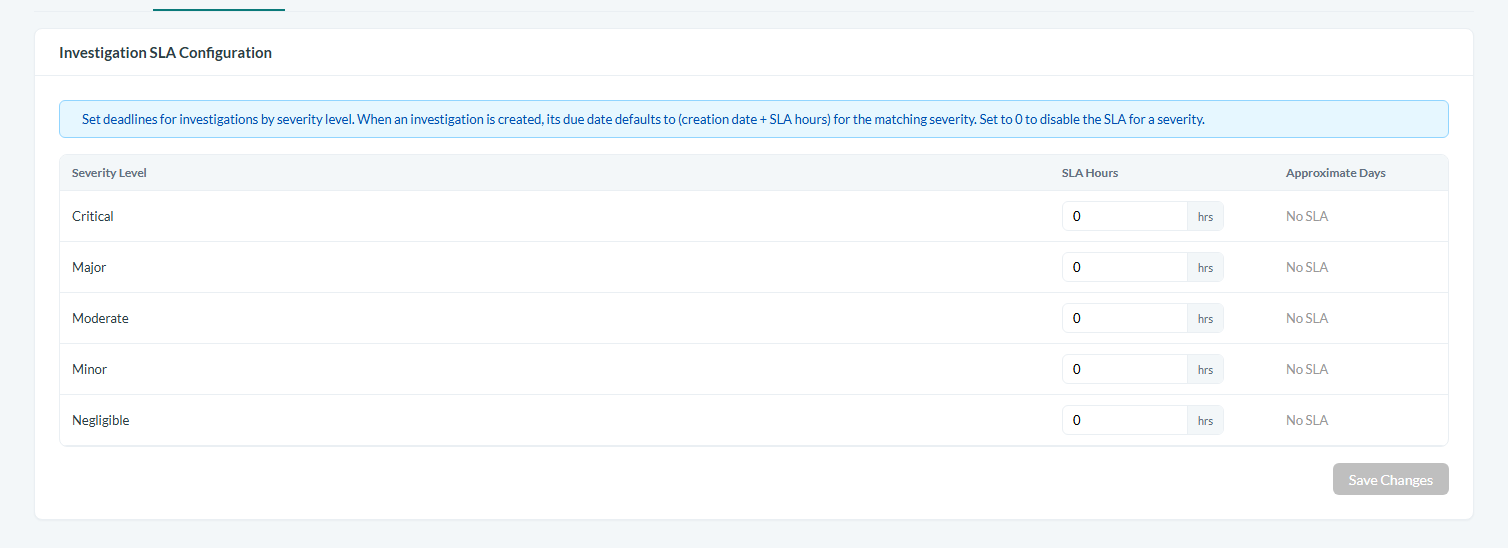
Caption: Sign in as a Super Admin, open Settings, then the Workflows group, then Investigation SLAs.
Reading your current configuration before changing it
Read the table as it stands before adjusting anything. Your account ships with a set of starting values, and someone may have already tuned them, so the values in front of you are the authoritative answer for your organization rather than any figure quoted elsewhere.
The pattern the defaults follow is that the more severe the level, the shorter the window: the most serious events are expected to be investigated quickly, and less serious ones are allowed more time because they can reasonably wait behind more urgent work. If your table does not follow that shape, that is worth a conversation before you change anything else, because an inverted ladder will quietly give your most serious investigations the most slack.
Editing the hours for a severity level
Select the number in the SLA Hours column for the level you want to change and type the new value. Repeat for any other levels you are adjusting, then select Save Changes to apply all of your edits at once.

Caption: Select Save Changes to apply all of your edits at once.
Because the system works in hours, you can express targets that do not fall on a whole number of days, which is useful at the severe end where a target of a day and a half is more meaningful than rounding to one or two.
Turning off the SLA for a severity level
To remove the requirement from a severity level entirely, enter 0 in its SLA Hours field and select Save Changes. Investigations at that level then show no countdown and never appear in overdue counts.
Use this deliberately. It is a reasonable choice for the least significant category, where a deadline would add pressure without adding value, but every level set to zero is a level nobody is being reminded about. If you find yourself zeroing a level because the target keeps being missed, the target is the problem and lengthening it is the honest fix.
Understanding when your changes take effect
Changes apply only to investigations created after you save. An investigation already underway keeps the SLA that was in effect when it was created, which means a change you make today will not rescue a case that is already overdue, and will not retroactively make a comfortable case look late.
That is deliberate: it protects work in progress from having its goalposts moved. If a specific in-flight investigation genuinely needs a different deadline, change that investigation's own due date on its overview instead of changing the account-wide setting.
Reviewing whether your targets are realistic
Once the values are in place, the dashboard tells you whether they were the right ones. Watch the overdue investigations figure and the compliance breakdown by severity over a few months.
A level that is occasionally missed is normal. A level that is missed consistently is telling you something, and there are only really two explanations: the target is tighter than the work allows, or there are not enough investigators for the volume at that level. Both are fixable, but only one of them is fixed on this page. Changing the number when the real constraint is capacity just moves the problem out of sight.
Conclusion
These settings are short to configure and easy to get subtly wrong. Read the existing table before editing it, keep the shape sensible so more severe levels carry shorter windows, use zero only where a deadline genuinely adds nothing, and remember that your changes reach only investigations created from that point on. Then let the dashboard tell you over the following months whether the targets you set are ones your team can actually meet.