





Summary
An investigation template is a reusable definition of how a particular kind of investigation should be run. It carries a checklist of steps, a set of suggested interviews, default root cause analysis methods, and the team roles that should be involved, so an investigation created from it starts already structured. This article covers building a template, filling in its checklist and interviews, and keeping your set of templates in good order over time.
Introduction
Without templates, every investigation starts from nothing and depends on the investigator remembering what a thorough job looks like. Two people investigating similar events produce different work, steps get missed under time pressure, and the quality of an investigation ends up reflecting who picked it up rather than what happened.
A template encodes your organization's practice once so it applies every time. Admins and Super Admins build them, usually reflecting how the safety team already works rather than inventing a new process. Templates also let you scale effort to the event: a brief review for a minor observation, a thorough protocol for a serious injury.
Key Concepts
- Template: the saved definition applied to a new investigation, supplying its starting checklist, suggested interviews, default analysis methods, and default team roles.
- Checklist item: one step in the template's checklist, with descriptive text and a flag marking whether it is required or optional. Items appear on investigations in the order they were added.
- Suggested interview: a prompt describing who should be spoken to and what to cover, recorded as an interviewee type and a description.
- Default RCA methods: the root cause analysis approaches pre-selected for investigations using this template. Investigators can change them when the investigation is created.
- Default team roles: the roles that make up the investigation team by default. Team membership can be adjusted after the investigation exists.
- Active: whether the template can be chosen when creating a new investigation. Inactive templates are hidden from that choice but stay attached to investigations already using them.
Steps to Follow
Opening the Investigation Templates settings
Sign in as an Admin or Super Admin, open Settings, then the Workflows group, then Investigation Templates. The page lists your existing templates with their status.

Caption: Sign in as an Admin or Super Admin, open Settings, then the Workflows group, then Investigation Templates.
Creating a template and setting its details
Select + Create Template and fill in the details.
Give it a Name, which is required, and make it describe scope rather than category, since this is what an investigator picks from under time pressure. Use the Description to explain when this template should be chosen and how it differs from the others, which is the field that prevents two similar templates being used interchangeably.
Choose an Incident Type if the template is designed for one, so it can be suggested when an investigation is created from a matching incident. Leave it blank to make the template available for any incident type.
Select the Default RCA Methods to pre-select, and the Default Team Roles that should form the investigation team. Both are starting points rather than constraints, and investigators can change them.
Set Active to control whether the template can be selected when creating an investigation.
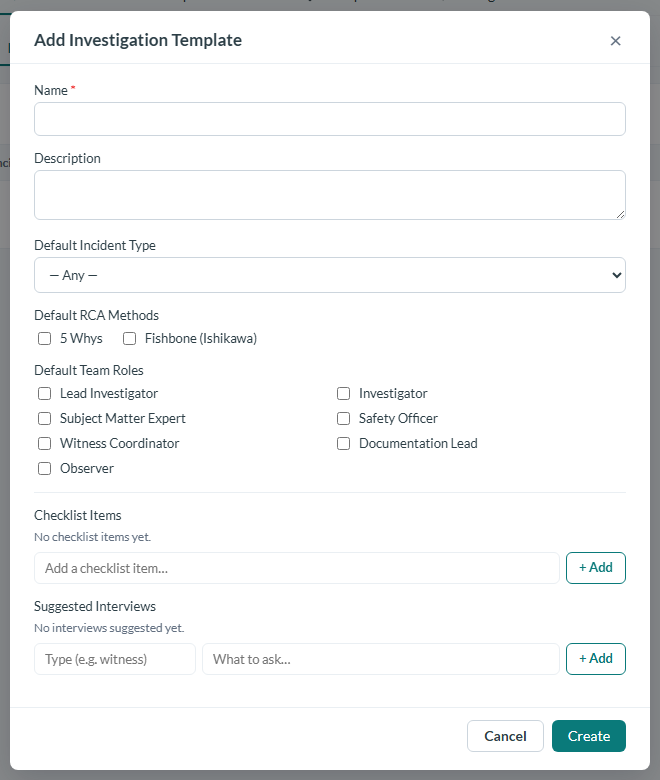
Caption: Select + Create Template and fill in the details.
Building the checklist
Checklist items are the steps that will be pre-loaded onto every investigation using this template, so this section is where most of the template's value sits.
In the Checklist Items section, type the item's description in the text field, select the Required checkbox if the step is mandatory rather than optional, and select Add. Repeat for each step. Items appear on investigations in the order you add them, so add them in the order they should be carried out. To remove one, use the delete icon beside it.
Write each item as a specific action rather than a topic. "Interview all witnesses" tells an investigator what to do; "Witnesses" does not. Where timing matters, put it in the text, because a step that must happen within the first day is a different instruction from the same step with no deadline.
Adding suggested interviews
The Suggested Interviews section records who should be spoken to. For each one, enter the Interviewee Type, meaning the person's role or relationship to the event, and a Description explaining what that conversation should cover. Select Add to save it, and use the delete icon to remove an entry.
This section earns its place on complex events, where the people worth interviewing extend past the obvious witness to a supervisor, an equipment operator, or whoever last maintained the thing that failed.
Editing a template and understanding what changes
Select the edit icon beside a template, make your changes, and confirm to save.
Editing a template does not change investigations that already use it. Only investigations created afterwards reflect your edit. This protects work in progress from shifting underneath the person doing it, and it also means fixing a mistake in a template does not fix the investigations that already inherited it, which will need handling individually.
Duplicating a template
To build a variant, use the duplicate icon. The copy carries the same checklist items and settings, and arrives with the same name, so rename it immediately to avoid two identically named templates in the selection list. Duplicating is the efficient way to create a heavier and lighter version of the same process without rebuilding a long checklist by hand.
Retiring a template without losing history
Use the status toggle on a template's row to deactivate it. It stops appearing when someone creates a new investigation, but stays attached to the investigations that already use it, so their history stays intact and readable.
Deactivating is almost always the right move over deleting. A template that has been used is part of the record of how those investigations were run.
Keeping the set small enough to choose from
Start with two or three templates: a light review for near misses, a standard investigation for injuries, and a fuller protocol for serious events. Add more only when a real gap appears.
A short list gets used correctly. A long one turns the first decision of every investigation into a judgment call, and people respond by always picking the same template regardless of fit.
Conclusion
A good template captures what your team already knows about running an investigation well and applies it consistently. Name it for its scope, write checklist items as specific actions in the order they should happen, use suggested interviews to point past the obvious witness, and keep the active set short enough that choosing is easy. Remember that edits reach only future investigations, and retire templates by deactivating rather than deleting so the record of past work stays intact.