





Summary
My Incidents is your personal view of every incident you have reported in the Safety App. It groups your reports into status-based tabs so you can quickly find a specific report and follow its progress from the moment you create it through to resolution.
Introduction
When you report a safety incident, you often need to check back on it later to see what is happening. The My Incidents page is built for exactly that: it shows only the incidents where you are the reporter, so you are never looking through reports that belong to other people.
This page is used by reporters, that is, anyone who has created and submitted an incident in the Safety App. It solves the problem of losing track of your submissions by giving you a single place to view each report, monitor its current status, and open it for more detail.
Key Concepts
- My Incidents is the page that lists only the incidents you personally reported, filtered to your account as the logged-in reporter.
- Reporter is the role that describes the user who created and submitted an incident. The page shows a report only when you are its reporter.
- Status tabs let you filter your incidents by their current stage: All, Drafts, Open, Under Investigation, Action Required, Closed, and Resolved.
- Incident card is the summary block shown for each report, giving you the essentials at a glance without opening the full report.
- Severity badge and Status badge are the labels on each card that show how serious the incident is and where it currently sits in the process.
- Incident detail view is the full page for a single incident, reached by selecting its card.
Steps to Follow
Open the My Incidents page
Go to My Incidents in the Safety App. The page loads with your reports shown, and you see only the incidents where you are the reporter.
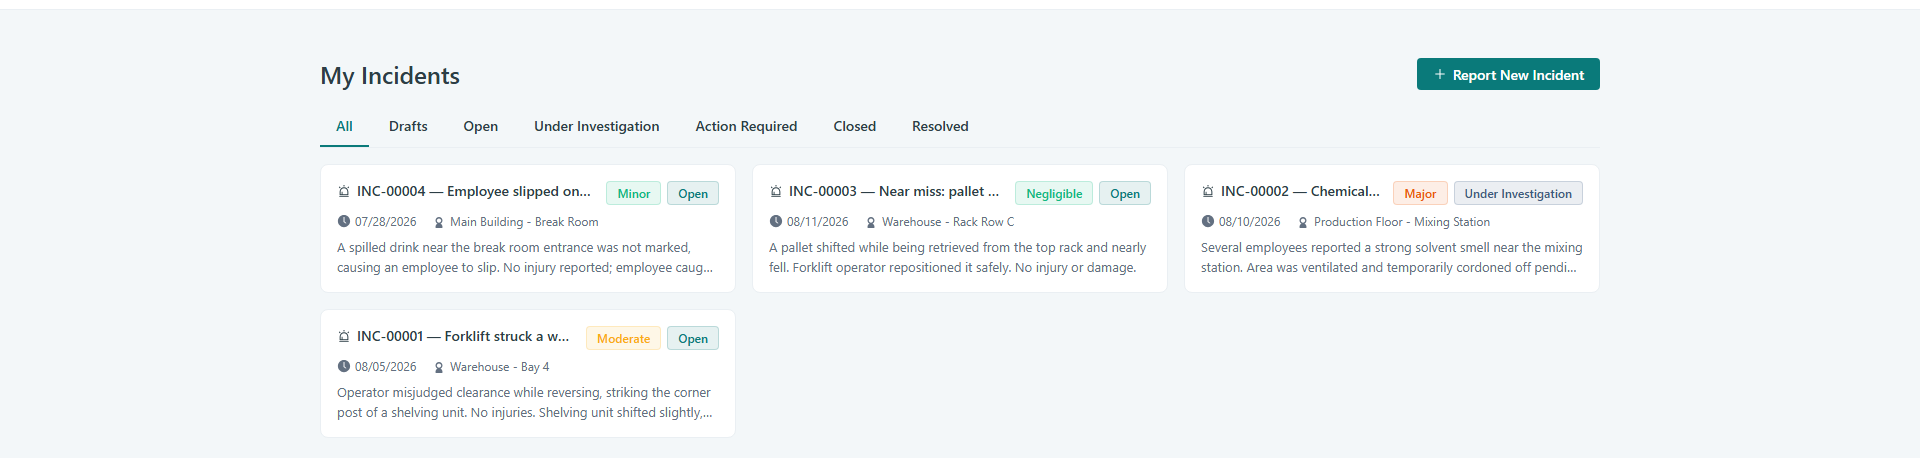
Caption: Go to My Incidents in the Safety App.
Filter your incidents by status
Use the tabs across the page to narrow the list to a single stage. Select All to see everything, or choose Drafts, Open, Under Investigation, Action Required, Closed, or Resolved to see only the incidents in that status. When you select a tab, the list updates to show just the matching reports.
Review an incident card
Each incident appears as a card summarizing the key information. On a card you can see the incident number (for example, INC-01), the Title, a Date (such as the incident, creation, or reported date), the Location, the Description, a Severity badge, and a Status badge. Use these details to identify the report you are looking for.
Open an incident for full details
Select any incident card to open its detail view. This takes you to the full page for that specific incident, where you can review all of its information.
Continue working on a draft
If a report is still a draft, find it under the Drafts tab and select it to open it. From its detail view you can continue working on the report you started earlier.
Start a new report
To create a new report, use the Report New Incident option on the page. This begins a fresh incident report, which will then appear in your My Incidents list.
Conclusion
The My Incidents page keeps all of your reported incidents in one organized place, with status tabs that make it easy to check where each report stands. Use it whenever you need to follow up on something you reported, revisit a draft, or start a new report.