





Summary
A campaign is how an assessment reaches people. You select the assessment, choose the user groups that take it, set the dates it is open, and decide what training follows the results. This article walks through creating a campaign and launching it.
Introduction
An assessment defines what gets measured. A campaign decides who takes it, when, and what happens afterward. Keeping the two separate means one assessment can drive several campaigns aimed at different groups or run at different times.
Campaigns are created by administrators and program owners. Before you begin, you need an assessment that is ready to use and the LMS user groups you intend to assess.
Key Concepts
- User Groups: The LMS groups whose members take the campaign. Membership is captured at launch.
- Access Opens, Due Date, Access Closes: The three dates that frame participation. Learners can start once access opens, are expected to finish by the due date, and cannot take part after access closes.
- No of Attempts: How many times a participant may take the quiz.
- Training Plan: What happens after the results are in. One of Same for All, Level Based, or Individualized.
- Phase: Where a campaign has reached, moving from not launched, to launched, to training assigned, to reassessment assigned, to done.
- Coverage check: A check run at launch that warns you about skills without enough questions to assess properly.
Steps to Follow
Accessing the campaign builder
Open Campaigns in the left sidebar. The list shows every campaign with its phase and dates, and you can filter by phase or search by name. Select Create campaign to start a new one.
Step 1: Name the campaign and pick the assessment
Enter a Campaign Title, then use Select Assessment to choose which assessment this campaign runs.
Name the campaign for the audience and the period, since the assessment name already describes what is being measured.
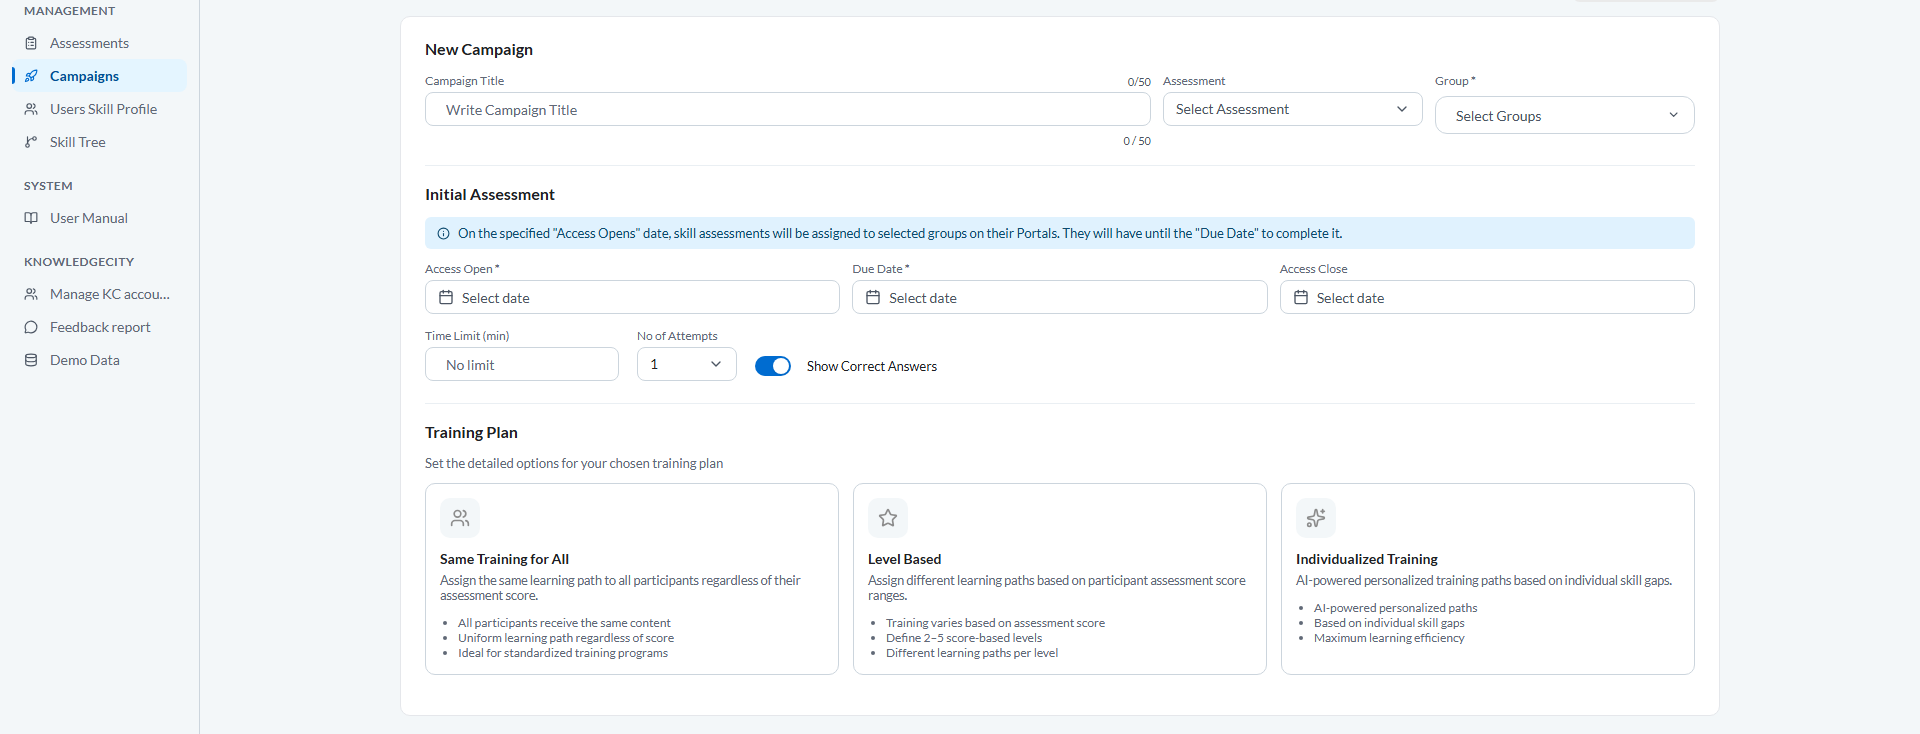
Caption: Enter a Campaign Title, then use Select Assessment to choose which assessment this campaign runs.
Step 2: Choose the user groups
Use Select Groups to pick the User Groups whose members take part. You can select more than one group.
Note: Group membership is captured when you launch. Users added to those groups after launch are not included, so make sure the groups are complete before you launch.
Step 3: Set the assessment dates and attempts
Set the three dates that frame the assessment:
- Access Opens: when participants can start.
- Due Date: when they are expected to have finished.
- Access Closes: after which the quiz can no longer be taken.
Then set No of Attempts to the number of tries each participant gets. KC Skills validates the order of these dates and tells you if the sequence does not make sense.
Step 4: Choose the training plan
Under Training Plan, pick how training is assigned once assessment results are in:
- Same for All assigns the same learning path to every participant regardless of their score.
- Level Based assigns different learning paths according to score ranges you define.
- Individualized builds a personalized path for each participant from their own skill gaps.
For Same for All, choose the path with Select Learning Path. For Level Based, add each level and attach a learning path to its score range.
Two options refine the behavior. Skip training for participants who achieve a perfect score avoids assigning courses to people with nothing to close. Require admin approval for individualized plans holds generated plans in a review queue instead of assigning them straight away.
Step 5: Set the training dates
Set the dates for the training phase in the same way as the assessment dates. The assessment window must close before the training window opens, and KC Skills flags the conflict if the dates overlap.
Step 6: Review the campaign
Review Campaign summarizes everything before anything goes live: the assessment, the groups, the assessment dates, and the training plan. Read it as your last check, because group membership and several settings are fixed at launch.
Step 7: Launch
Select Launch Campaign. Before launching, KC Skills runs a coverage check and lists any skills that do not have enough questions to fully assess participants. Skills with no questions at all are called out as skills that will not be evaluated.
Treat that warning seriously. If a skill has no questions, it produces no result, and the gap analysis and any individualized training built on it will be incomplete. Add questions and launch afterward, or continue knowingly if the skill genuinely does not matter for this run.
On confirmation the campaign status changes to Active and participants are notified.
Managing a campaign after launch
Open a campaign to reach its tabs: Dashboard for schedule, groups, and participants, Scores for results, and Questions for the question bank. A fourth tab, Individualized Plan, appears when the training plan is set to Individualized.
Note: There is no cancel action on a running campaign. A campaign can be deleted, which removes it and cannot be undone, so use deletion only for campaigns launched in error.
If you change the underlying assessment's skills after creating the campaign, KC Skills offers to sync the assessment skills so the campaign matches the assessment again.
Conclusion
A campaign turns an assessment into a scheduled activity for a defined audience, with a training plan attached to the outcome. Set the groups and dates carefully because they are fixed at launch, take the coverage warning seriously, and use the campaign's own tabs to follow it through to results.